Temple and Family History Lesson 6: Memories
Temple and Family History Lessons
Lesson 6
Memories
In Lesson 5 we considered the task of adding persons to the
Family Search Family Tree by using the “Add” tools on the ‘Person Page’. In this lesson we will learn how to add
memories such as photos, documents, and stories to the Person Page.
The Church, the creator of ‘Family Search’, intends for this
site to be much more than a repository for the world’s genealogy. The expression used to identify this work in
the church is “Family History”, rather than ‘Genealogy’, because it is hoped
that members seek out the histories of their ancestors rather than just names,
dates, and places. This intent is
nowhere more visible than in the provision on the Person Page for saving all kinds
of historical information pertaining to the ancestor. The name of this history-saving place is
called “Memories”.
This name is fitting because, if you ask what kinds of
things should be added to this place, the answer is anything that contributes
to the ‘memory’ of this person by their descendants. The most obvious choices for such
memory-preserving materials are photos of the person and of anything that would
contribute to their memory, documents including certificates from vital events,
from life celebrations, anniversaries, graduations, military or professional
service, and written or recorded accounts from the person’s life. These last are called stories. Stories may be typed directly into the ‘Memories’
page from a keyboard, or may be pasted in as scanned pages like a photo or
other image, or they may be added as audio recordings in various formats.
We will start investigating the ‘Memories’ page by returning
to the ‘Person Page’.
Figure 1 is an image of the Person Page for my grandfather,
Sidney S. Carter. On this image I have
circled the menu choice called ‘Memories’ from the main horizontal menu just
below the name of the person.

Notice first that three of these menu options have numbers
attached to them; Sources, Collaborations, and Memories. The number reflects how many of each thing
will be found when you click on the link.
In the case of my grandfather the number is zero. No one in my family has posted anything to
his person page.
Another comment would be fitting at this point. An important issue in the adding of memories
to the Family Search program has nothing to do with Family Search, but is
concerned with our understanding of file storage on our computer and where
things like photos and documents are to be found and how to find them and move
them from place to place. This
fundamental computer skill is outside the scope of these lessons. You might have to enlist the help of children
or grandchildren to teach you how to do things like scan old family photos or
photograph them and then put them somewhere on your computer where you can find
them again. For most of us this is
definitely the most troublesome part of ‘Memories’ and is probably the reason
my grandfather, Sidney, has no memories attached.
Assuming you can deal with finding files on your computer,
let’s go ahead with adding a photo, not to Grandpa Sid’s page, but to the page of
his father, William Henry Carter.
Figure 2 is an image of the page that opens when we click on
the ‘Memories’ link. Excuse me for
switching to the page of my great-grandfather, William Henry. By the time I got round to taking this
screenshot I had already added two photos to Sidney’s page and I wanted to show
a blank page. (It’s revealing that no
one in my family has added a photo to William Henry’s page either. I guess we are not a very photo-conscious
family.)

Figure 2. The Memories page, showing no memories in this case.
On figure 2 I have circled the link “Upload Photo”. Clicking on this link will give us the
opportunity to add a photo to this person’s page. Figure 3 is what we see when we click on
‘Upload Photo’. Family Search has automatically
opened my personal ‘Pictures’ folder on my computer’s hard drive. I am using a PC with Windows operating
system and in that environment this is the folder most likely to have photos
stored. On a Mac or other computer or
operating system the folder that opens may be different, but most systems have
a folder designated primarily for pictures and Family Search will look for this
folder and open it.
In my case the photos of my grandparents are not in this
folder, so I have to navigate to a different folder to find them. This is where an understanding of file
storage on your computer is necessary. In my case this ‘Pictures’ folder does not
have any photo of my great-grandfather, William, so I have to navigate to a
different folder to find the photo I want. Figure 4 shows that folder and I
have circled the photo that I want to upload to Family Search.

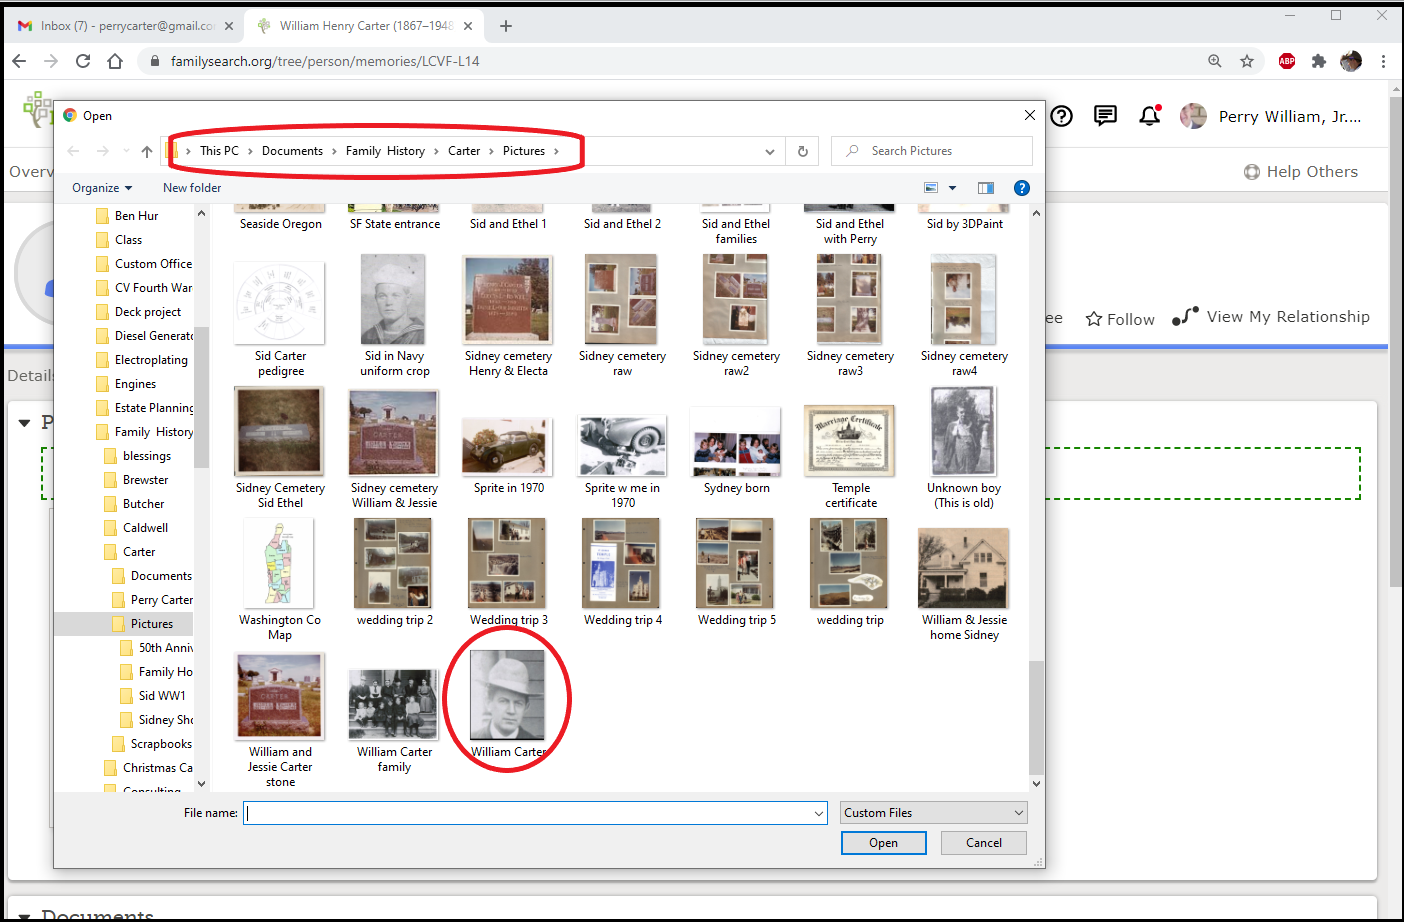
Figure 4. My folder where photos of William Carter are located.
In Figure 4 I have navigated to a different ‘Pictures’
sub-folder whose path is highlighted in the red oval. The photo I have highlighted in red is of my great-grandpa
William Henry. This is the photo we will
upload to Family Search.
Family Search has a feature whereby the next time I click on
the ‘Upload Photo’ link this same folder will open. Family Search remembers where each previous
photo was uploaded from and returns to that folder the next time a photo is
invoked.
Figure 5 shows what happens when you click on the ‘Open’
button at the lower right corner of the page in Figure 4. Family Search takes you back to the Memories
page and puts your selected photo on the line designated ‘Photos’. Notice that the photo has the word
‘Processing’ written across it. Family
Search requires some time to upload the photo.
The length of time may range from a few seconds to several hours depending
on conditions that I don’t understand.
But eventually the superimposed word, ‘Processing’, disappears and the
clean photo is left showing. Until that
happens you can do nothing more with that photo.

Once the ‘Processing’ operation is complete one of the first things you might want to do, if someone else hasn’t already done it using some other photo, is set the new photo to serve as the identifying photo for the person whose page you are working on. Once this photo is so designated it will appear next to this person’s name in many other Family Search pages, such as in several of the ‘Tree View” charts.
The
simplest way to accomplish this designation is to click on the blank photo
circle shown next to the name of the person (circled in red in Figure 5). When you do that a flag opens under the
circle that reads “Add Portrait” as shown in Figure 6. Notice also that in Figure 6 the ‘Processing’
word is gone from the photo. In this
case it only took a few seconds.

When you click on that ‘Add Portrait’ flag another small box
opens giving three choices for this identifying photo; upload a new photo,
select a photo from your “Gallery” which is a collection of all the photos you
have previously added to your tree, or select a photo from this person’s memory
photos which have already been uploaded (and processed). We will chose the third choice as indicated
in Figure 7. Since in this case we only
have one photo to choose from the selection is not difficult. Make the choice by simply clicking on the
photo. When you do, the screen shown in
Figure 8 appears allowing you to position and crop the photo so as to best fit
into the photo circle. You can reduce or
enlarge the size of the photo using the slider on the left side, and the
circular picture frame can be dragged with the mouse into position to best
frame the image as a portrait.


When you are satisfied with the fit of the portrait to the
circle click on the link “Save as Portrait” to set this picture as the identifying
portrait on the Person Page as well as in every other instance in Family Search
where the identifying photo appears.
The photo does not appear immediately in the circle. Figure 9 shows the screen after clicking on
‘Save as Portrait’ in Figure 8. A small
clock appears in Figure 9 next to the photo circle indicating that the photo is
again being ‘Processed’. This can again
take anywhere from a few seconds to several hours.


Figure 10 shows William Henry’s Person Page with his photo processing
now finished and the new photo in place as his Identifying Photo. Notice also that the number next to the ‘Memories”
link is now a ‘1’, representing the photo we just added.
Let’s return now to the ‘Memories’ page and add some
clarifying information to William Henry’s photo.
Do this by simply clicking on the ‘Memories’ link again.

Figure 11 is the screen that opens after two clicks; the
first click on the ‘Memories’ link from the ‘Person Page’, and the second click
directly on the photo that we want to add information to. We want to add a title to this photo so I
have circled the “Add Title” link in the upper left corner.
After clicking on the words “Add Title” the page appears
that is shown in Figure 12. In the box
that appears where the words “Add Title” were previously displayed, I have
typed in a title for this photo; William Henry Carter – About 1905.

Figure 12. A title has been added to the new photo.
If we now click on the blue “Save” button the image reverts
back one screen and now shows the title in a large font, usually colored, where
the “Add Title” link had been, as seen in Figure 13.
Now notice at the bottom of Figure 12 the words: Share what
you know about this image”. This is
where we can type in any discussion that would be appropriate about this photo,
such as where and when it was taken, who took it, what was the occasion,
etc. In Figure 13 I have typed in some
descriptive information regarding this photo.

Clicking the blue “Save” button to the right of this text
entry will return to the image on the ‘Memories’ page, now showing the newly
added text. This text may be edited or
added to at any future time by the same sequence.
If we are done clarifying this photo we can now click on William
Henry’s name at the top left corner of the screen (red circle in Fig. 13) and thereby
return to his ‘Person Page’.
With this detailed excursion through the “Add Photo” process
we will find the “Add Document” and “Add Story” routines to be similar and
manageable without further instruction.
The limits on the amounts of photos, documents, and stories are almost
unlimited; most of us will never fill up our allotted space. This is an effective way to share memories
about an ancestor with all members of the family, young and old, members or
loved ones of other faiths, as well as with complete strangers! Keep in mind that all members of the family
can add to or edit these memories, so don’t be surprised if you see something
added by a distant cousin that you had never heard of before. That is one of the beauties of a ‘One-World”
tree.

Comments
Post a Comment