Temple and Family History Lesson 3: The Family Tree
Temple and Family
History Lessons
Lesson 3
The Family Tree
Welcome to Lesson 3 on this “Introduction to Family Search”
lesson blog. In the last lesson we
explained how to set up a personal Family Search account and log into that
account. In this lesson we will look at
one of the first things to do once you are signed in, the Family Tree or
pedigree chart with you in the first position.
We will show you how to connect yourself to the Family Search World
Tree, and then how to use the four available views of the tree with each of
their options.
The Family Search web site opens with a page that is unique
to each user. This opening page is
created from your past activity on the website, and your current calling in the
Temple and Family History world, if you have one. It may also include references to new “Hints”
regarding your ancestors or discoveries posted by others about shared
ancestors. There may also be notices of
messages to you from other users who have seen your work and have questions or
comments for you.
But every page will open with a home menu across the top as
circled in Figure 1 below.

Figure
1. Opening the Family Tree
To begin this lesson, once you are signed in and have this
home page opened, click on the words “Family Tree” as shown in the large red oval. Then click on the word “Tree” in
the sub menu that opens below.
If this is truly your first time opening the Family Tree, I
am not sure just what you will see.
Because you provided your name, sex, and birthdate when you created your
new account, these may be displayed as your opening tree.
A little explanation is now in order. The Family Search Family Tree is unique among
the thousands of genealogical research tools in existence on the Internet. It is unique because it is a “One-World”
tree, that is, Family Search is creating one gigantic tree that includes
everyone’s ancestors, all connected together in one huge database. All users access that same giant database,
and can add to it or edit it according to their sources, or knowledge, or
whims! All other on-line pedigree
charts, or family trees, available on the Internet, include only the ancestors
of the account user, as provided by that user.
No other users have access to that data, to edit or add to it. It is a totally private tree.
This is extremely important to remember when working in
Family Search. Other users can freely
change the information pertaining to any deceased person in the “World
Tree”. As you can imagine this is
indeed problematic, and it is amazing that the tree survives at all. On one hand it is helpful to benefit from the
knowledge and researches of related cousins in identifying and completing
detailed information on your deceased ancestors. On the other it can be exasperating to have
information that you know, or believe is correct, changed by complete strangers
who presume to know more than you.
Fortunately, the change process asks for sources and solid
evidence when adding or changing information.
But it is ultimately up to the user to provide such evidence. In order to be a solution and not a source of
the problem, we have an obligation to add or edit only information that we can
verify with strong documentation. This
is a challenge for everyone.
Living persons occupy a different space in Family
Search. The information on living
persons is kept private and cannot be edited by anyone but the person who originally
created the record. In order for you, as
a living person, to make a connection into the “One-World Tree”, you have to
connect yourself to a deceased ancestor already in the tree. For new account users this would be the
first task.
Again, if this is your first time opening Family Search, I
am not sure what will appear when you click on “Family Tree” and “Tree” as
shown in Figure 1. If your name appears,
there may be a clickable link labeled “Add Father” or “Add Mother”. Try clicking on one of these links.
If your father and mother are both living, you can add their
name in the window that opens and identify them as “living”. Family Search will then create a record for
them as your living father or mother. If
they happen to already exist in the tree, say as entered by one of your
siblings, you will not know it. The
record you create for them will have a different “ID Number” from the record
created by your sibling. Again, living
person’s records are protected and not available for editing by others, even
their own children or spouses.
If you have entered the name of a living parent, you still
need to connect to a deceased person who already exists in the Family Search
tree. You now need to enter the name
of one of your grandparents, and continue back until you arrive at a deceased
ancestor.
Let’s say your father’s father is deceased. To enter his name you can click on the small
arrow in the circle just past the right-hand edge of your father’s box on the
pedigree chart, as shown in Figure 2.
This will open the boxes that say “Add Father” and “Add Mother”. In the Figure 2 example I have shown this
step for my great-great grandfather, as he is the first name I come to where
the parents are unknown.

Figure 2. Opening the
“Add Parent” link.
If it is your grandfather who is deceased, click on “Add
Father” and the box shown in Figure 3 will appear.

Because your grandfather is deceased Family Search should be
able to find him and add him as the father of your living father. Insert your grandfather’s first and last
names in the labeled boxes, and click the Deceased box. Adding a birthdate and place will make it
easier for Family Search to find him.
You can also click on the ”Father”, “Mother”, or “Wife” links at the
bottom of the box if you know any of these people. When you click “Next” at the bottom right
corner of the dialogue box, Family Search will search through it’s billions of
extant names and present, in the next screen, all matching names, if any. If you see the correct name in the selection,
click on that name and it will become the gateway for your connection to the
World Family Tree. If no name is found
by Family Search that matches your grandfather, you will be asked if you want
to create a new record for him. If you
click “New Record” you will be asked for your evidence or source for the new
information. Enter whatever is your best
source for your grandfather’s information.
Sometimes it could be just Personal Knowledge in the case of
grandparents or immediate family, but some documented source is always
preferred.
In any case, if you
create a new record for your ancestor, it is likely that with additional
investigations, you will find that the ancestor you just created actually does
already exist in Family Search, only under a variation of the name or birthdate
or place, and then you will have to make a correction by merging the two
records, the one you created with the already-existing one. This process will be covered briefly in a
later lesson on correcting errors.
If this all worked, you are now officially connected to the
Family Search World Tree, and can begin to navigate the tree and see your
ancestors and their families. You will
probably want to repeat this exercise and add your remaining three grandparents
(grandpa’s wife may have been added already if Family Search identified the
couple, rather than just your grandpa), so you will have access to their
ancestors as well.
Now let’s talk about navigating the Family Tree, and the different ways of viewing it.
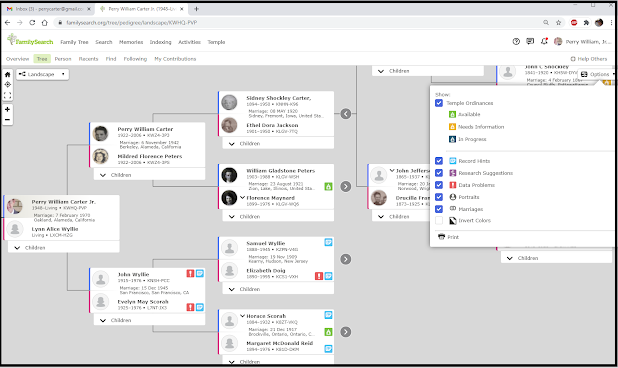
Landscape View:
The landscape orientation of the tree is the default, and perhaps the most common, view. It shows the most information, such as marriage dates and places, and includes expand arrows to reveal the children of each couple. You can control the amount of information shown in the name boxes by clicking on the “Options” link at the upper right corner of the screen and selecting or de-selecting, by clicking, the various items of information.
The size of the tree can be increased or decreased by
clicking on the + or – signs at the upper left corner of the screen. There you can also select “Full Screen” by
clicking the broken box and return to the default screen size by clicking the
broken box again.
By clicking the down arrow next to the word “Children” in
any couple box, a list of known children of that couple will appear. We will discuss this further in the
discussion of the “Person Page” in the next lesson.
In the upper left corner is a box that will show the word
“Landscape”, indicating the landscape view mentioned above. By clicking on the small down arrow also seen
in that box, a menu of tree views is shown.
This menu link is shown in Figure 4.

Figure 4. Selecting the Tree View Menu of options
The menu of tree views includes: Landscape (the default
view), Portrait, Fan Chart, and Descendancy and is shown enlarged in Figure
5.

Figure 5. Tree view menu.
Portrait View:
Click on the word, “Portrait” to see what that does. Less information is now shown and the tree progresses vertically from ancestor above to descendant below. The option to view children is not offered. This portrait view is the most frequently seen in traditional genealogical work.
The Fan Chart view:
Next click on the words “Fan Chart”. This will display the 4-Generation fan chart
so adaptable for printing because of its compact presentation.
The fan-chart view has several optional formats. It can show 4, 5, 6, or 7 generations by
selecting the number from the selection box that opens just to the right of the
menu. Then the content of the chart can
be selected from among the seven options shown in the fan chart menu as seen in
Figure 6. By selecting from among these
options, the fan chart information will switch between showing just family
lines, to Birth Countries, to the existence of Sources, the existence of Photos, Research Hints that can be followed as research, and the status of
temple Ordinances for every name on the chart.
This is extremely useful in studying where to spend a limited block of
time each time you come to work.

In the example of Figure 6 the option is set to Ordinances (notice the check
mark to the left of the menu selection, “Ordinances”). The white
background in the person’s segment indicates all ordinances are complete and
the green indicates that one or more ordinances may be requested. The colors are identified by viewing the legend on the
right-hand edge of the screen. We will
talk more about requesting temple ordinances in a future lesson.
It is simple to change the person occupying the
center of the fan circle. If you hover
the mouse curser over any name on the chart a shaded arc will appear at the
inner radius of the segment. Clicking on
that shaded arc will place that person at the center of the fan. You can move the fan around on the screen by
clicking anywhere on the fan and, while holding down the left mouse button,
dragging the image in any direction (click-and-drag). This is particularly useful in the
seven-generation view where the entire fan cannot be fit onto a single screen
unless the scale is reduced significantly (remember the +/- buttons).
There is another particularly useful feature in all the
Fan-Chart views, that they can be printed in a convenient format for study or
display. This feature is accessed by
clicking on the “Options” link at the upper right corner of the screen just
above the color legend.
Descendancy View:
Notice that so far only the Landscape view allows you to see
the children of couples. This is a
definite advantage of the Landscape view as we most often want to see the
families of our progenitors, not just the names of the direct ancestors. The last option on the Tree-View menu answers
this need in the extreme, the “Descendancy” option.
The object of this view is to show the complete families and
all of the known descendants of each person in the Family Tree, as well as
details concerning their research status (available hints, research suggestions,
etc.) and their temple ordinance status.
The view will open with the most recently highlighted person at the top
of the chart. An example of the
4-Generation Descendancy View is shown in Figure 7.
Click on the word "Descendancy" at the bottom of the Tree View menu
box. Try selecting more or fewer generations
in the view, up to four generations on the selection bar at the upper left of
the screen. Also try clicking on the
“Expand” upward arrow at the far upper left corner of the screen. This will allow you to select as the top
person on the chart any of several ancestors of the current top person.

From a research standpoint this is the most useful form of
tree view. From this view you can
quickly see the spouse and all the children of any person, the spouses of those children, and
all of their children and spouses, down to the most recently known names. This is the only view where it is easy to see
gaps in the records such as missing spouses and children. Data problems are also revealed by
color-coded tiles to the right of each name, with ordinance status shown for
each by tiles of different colors.
Many researchers spend their entire time working off of this
chart, searching for missing persons and working our data irregularities. This is called “Descendancy Research” in
Family Search jargon. It has become a
popular area of research since the Church authorized members to seek out and
perform temple ordinances for all of the descendants of direct ancestors.
This permission authorizes us to
search and discover many millions of persons who have a defined ancestral
relationship to us (aunts, uncles and cousins) that before were not recommended
for submission to the temples. The
restriction that we most often run into in doing “Descendancy Research” is that
persons born fewer than 110 years ago may not have their names submitted without
first obtaining written permission from the closest living relative. This is often impossible or very difficult to
obtain and so we confine our research to those persons born more than 110 years
ago. That still allows for millions of
names available for searching, identifying, and submitting.
Most researchers do not hesitate to add the names and
information of more recently-born relatives to the Family Search tree for their
historical and familiar value, accepting the fact that their ordinances may
have to wait some years.
This is the end of Lesson 3.
We have discussed the Family Search World Tree and how, as a new account
user in Family Search, to find a known deceased ancestor and use them to connect to
the tree. We then looked at the several
possible views of the Family Tree, Landscape, Portrait, Fan Chart, and
Descendancy, and the uses and benefits of each.
In the next lesson we will look at the most-used information page in
Family Search, the “Person Page”.
You might find it useful at this stage in your progress on
Family Search to have a look at the website titled “The Family History Guide”,
or “thefhguide.com”. This is a complete
instructional web site for all things dealing with the Churches Family Search tool. More details related to the
topics of this lesson can be found under the link “Getting Started” on "thefhguide.com" home page. The Guide
will provide helpful supplemental material for all of the lessons on this blog. I will recommend links where they apply to
each topic.

Comments
Post a Comment