Temple and Family History Lesson 5 : Adding Names
Temple and Family History LessonsLesson 5Adding people from the Person Page
In our previous lesson we introduced ‘The Person Page’ in Family Search, and we looked at some of the factual information displayed on The Person Page. We also showed how to review the status of Temple Ordinances for the person on the Person Page and how to request that ordinances be performed for that person. In this lesson we will describe how to add names to the Family Search tree from the Person Page.

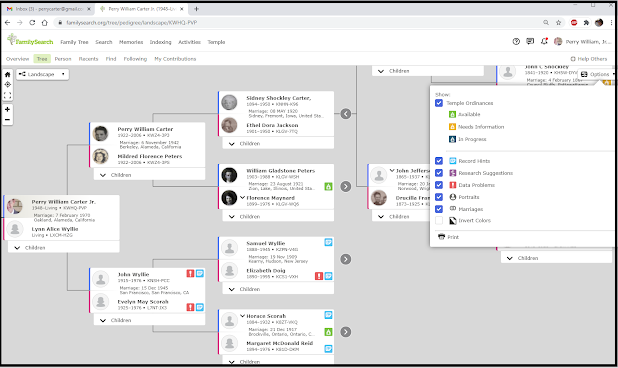
Figure 1. Adding Names through the Person Page
Figure 1 is a screenshot of the ‘Family Members’ section of my mother’s Person Page. In this figure I have identified five links that can be used to add names from this page. The circled links are numbered 1 through 4 and the fifth link is just numbered, “5”.
Link No. 1 is used to add a spouse to the database. This could be a first spouse or an additional spouse of the person whose Person Page you are working on. If it is an additional spouse, when it is entered it will cause another Couple Box to open. Depending on the marriage date, the new box will display either before the existing box if the date is earlier than the date of the existing marriage, or after if the marriage date is after the date of the existing marriage. If there is no marriage date the boxes will appear in the order added.
Link No. 2 is used to add a child of the marriage immediately above the link. (Each Couple Box will have its own corresponding list of children for that couple.) The children in the group are displayed in birth order. By the way, clicking on any child’s name will open the ‘Person Detail’ page which in turn allows that child’s ‘Person Page’ to be selected.
Link No. 3 is used to add a parent of the person whose Person Page you are working on. This link will still allow you to add a parent even if both parents are already shown in the ‘Parents’ box. In this case I don’t know what Family Search does with the additional parent name; I have never tried to add a parent in this situation.
Link No. 4 is used to add a sibling of the person whose ‘Person Page’ you are working on. This sibling could also be added on the Person Page of either of the Parents shown on this page. In that case it would be added through link No. 2.
Link No. 5 is used to add a child of the mother shown in the Couple Box if the father of the child is unknown. The father can be added later on this same page as a spouse of the mother, or he could be added as the father of this child on the child’s own Person Page.
Each of these five links, when clicked on, will open a similar box for entering names. Figure 2 shows a sample of this box that opens when I click on link No. 1 on my Mother’s Person Page.

Figure 2. Open Dialog Box for Add Spouse.
My mother only had one husband so there is no spouse to add, but we will consider this box as typical of all the “Add Person” boxes that open on the Person Page. The first thing to note is the clarification at the top left of the box that we have indeed opened the ‘Add Spouse’ box. It is not hard to open the wrong box here and they all look almost identical.
The next thing to note is the choice we have to add a person either by name or by ID Number. If the name we want to add as spouse is already in the Family Search data base and we know or can find the ID Number, this is the surest and quickest way to add the name.
If you don’t know the ID Number of the spouse you want to add, but you do have a name, then click on the link with the words “By Name”. This link will take you through the process of searching the database for that name. This search can be done in other, more direct ways, but I think the search engine is the same in any case so the resulting names that are found should be the same.
The Dialog Box of Figure 2 is by default set to the ‘By Name’ selection. Enter as much information in this box as you confidently know. Note that the spouse’s sex is already chosen for you, depending on whether you are adding a husband or a wife.
If you select the status, ‘Living’, you will be told that you have to create this person as a new person for your own use to make a connection to some deceased person in the database. This is because you cannot be given the ID Number of the same living person who may have been created by someone else. When you click on ‘Next’ at the bottom of the box to add a living person, a new person will be created, even if that living person is already in the database.
If you select the status, ‘Deceased’, you will see the explanation that this spouse may already be in the database, or may not. Family Search will search its database of billions of names and present you with what it thinks are the closest matches for the information you entered. Figure 3 shows that screen for an unrelated name I entered just to illustrate.

Figure 3. Entering a name in the Add Spouse box.
When you click on the link “Next”, at the bottom of this box, the screen shown in Figure 4 opens.

Figure 4. Create a new person or add an existing person.
In Figure 4, Family Search has searched its huge database and returned every name that comes close to agreeing with what you entered in the Figure 3 box. In this case only one name came up, and it is a pretty good match agreeing in name, dates, and places. If this returned person is not the person you desire to add as a spouse, then you can assume that your desired person is not in the Family Search database, in which case you can click on the link circled on the left, “Create Person,” and a new person having the name and information that you entered will be created.
If the returned person is the person you desire to add, click on the link “Add Match” circled at the right. When you click on “Add Match” the person shown from the Family Search database will be added as a spouse of the person you are working on, along with all other information associated with that new spouse, such as parents, children, and other spouses.
Be careful using the “Create Person” choice in this box. In many, many cases a Family Search user will select this choice only to discover, after a little more detail has been found for this person, such as a more complete name or birthdate or place, that he or she was already in the database and was just overlooked when the new name was added. This results in having to merge the two names, which is more work and usually leads to additional merges of duplicate children and spouses. It is often best to fill in less information in the Figure 3 screen so that fewer potential matches will be eliminated and more choices will be shown. It may be wise to fill out the Figure 3 screen several times with small variations in your information to see if more potential matches can be found. Selecting the ’Create Person’ choice should always be a last resort!
Clicking on any of the other “Add” links (2 – 5 in Figure 1) will open a box very similar to that of Figure 2, again offering the option of entering either a name or an ID Number. Then the next box will offer the second choice of either creating a new person if the search did not find any name that closely matched the one you entered, or adding an existing name if the search did find a name that matched the one you entered. This is the way names are added to the tree in Family Search.
Each time you add a name in this way you will want to go to the ‘Person Page’ for the added person and click on the “Ordinances” link to see if any ordinances are incomplete and can be submitted. If you added a name that was already in the database chances are good that the temple ordinances have already been completed, except for the sealing to spouse because you have just created that union. If you created a new person, and you have entered a name, birthdate, and birthplace, and the birthdate is more than 110 years ago, then you should be able to request individual ordinances for that person.
For more help with adding names to the tree in Family Search you can go to the link {https://www.thefhguide.com/project-1-family-tree07.html}. This is the link to Goal 7 in The Family History Guide under Project 1, “Family Tree”, “Add ancestors”.
In this lesson we have looked at how to add names to the tree in Family Search using the Person Page. In the next lesson we will discuss adding Memories to the Person Page.

Comments
Post a Comment